Step by Step Configure and Send Apple Push Notifications
Configure and Send Apple Push Notifications Using PushSharp

Go to the App IDs section to setup Push Services for your App.

Step 3
If you already have an App ID, continue to Step 5.


Step 5
If Push is already enabled for your App, it may be worth going in to configure it again, and regenerate your certificates, unless you know for certain that the private and public keys for your certificates are already exported in a .p12 file, or you know where they are to obtain a .p12 file with them. If that didn't make any sense, or push is not already enabled, or it is enabled but no certificates have been created, continue following!


Step 7
NOTE: After this guide, you will repeat steps 7 through 20 for the 'Production' Push SSL Certificate.

Step 8


Step 10

Step 11

Step 12


Step 13

Step 14

Step 15


Step 17

Step 18
IMPORTANT: Make sure your Certificate has the private key associated with it in your keychain. Some people make the mistake of going into the provisioning portal on a different development machine, and simply downloading the Push certificate that's already been created previously. If you do this on a different machine, it will NOT have the private key, and you will not be able to use it to connect to send notifications. One way you can tell if the private key exists in Keychain is if there's a little grey triangle beside the certificate that when clicked, expands the certificate to show the private key associated with it.

Step 19

Step 20
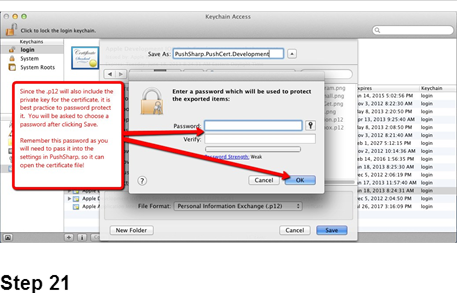

Step 22

That's it! As mentioned before, you can repeat steps 7 through 20 for your Production certificate.
No comments:
Post a Comment