Sunday, March 19, 2017

A Fast Approach to List Prime Numbers in Python

A Fast Approach to List Prime Numbers in Python

In this post, an efficient function is developed to generate all the prime numbers that are smaller than an arbitrary number x.


def GeneratePrimes(x):
    nums = set(range(x, 1, -1)) # set of all numbers to be checked.
    p = [] # list of prime numbers to be returned.
    while nums:
        n = nums.pop()
        p.append(n)
        nums.difference_update(set(range(n*2, x+1, n)))
    return p


print(GeneratePrimes(2000))

Result:

   [2, 3, 5, 7, 11, 13, 17, 19, 23, 29, 31, 37, 41, 43, 47, 53, 59, 61, 67, 71, 73, 79, 83, 89, 97, 101, 103, 107, 109, 113, 127, 131, 137, 139, 149, 151, 157, 163, 167, 173, 179, 181, 191, 193, 197, 199, 211, 223, 227, 229, 233, 239, 241, 251, 257, 263, 269, 271, 277, 281, 283, 293, 307, 311, 313, 317, 331, 337, 347, 349, 353, 359, 367, 373, 379, 383, 389, 397, 401, 409, 419, 421, 431, 433, 439, 443, 449, 457, 461, 463, 467, 479, 487, 491, 499, 503, 509, 521, 523, 541, 547, 557, 563, 569, 571, 577, 587, 593, 599, 601, 607, 613, 617, 619, 631, 641, 643, 647, 653, 659, 661, 673, 677, 683, 691, 701, 709, 719, 727, 733, 739, 743, 751, 757, 761, 769, 773, 787, 797, 809, 811, 821, 823, 827, 829, 839, 853, 857, 859, 863, 877, 881, 883, 887, 907, 911, 919, 929, 937, 941, 947, 953, 967, 971, 977, 983, 991, 997, 1009, 1013, 1019, 1021, 1031, 1033, 1039, 1049, 1051, 1061, 1063, 1069, 1087, 1091, 1093, 1097, 1103, 1109, 1117, 1123, 1129, 1151, 1153, 1163, 1171, 1181, 1187, 1193, 1201, 1213, 1217, 1223, 1229, 1231, 1237, 1249, 1259, 1277, 1279, 1283, 1289, 1291, 1297, 1301, 1303, 1307, 1319, 1321, 1327, 1361, 1367, 1373, 1381, 1399, 1409, 1423, 1427, 1429, 1433, 1439, 1447, 1451, 1453, 1459, 1471, 1481, 1483, 1487, 1489, 1493, 1499, 1511, 1523, 1531, 1543, 1549, 1553, 1559, 1567, 1571, 1579, 1583, 1597, 1601, 1607, 1609, 1613, 1619, 1621, 1627, 1637, 1657, 1663, 1667, 1669, 1693, 1697, 1699, 1709, 1721, 1723, 1733, 1741, 1747, 1753, 1759, 1777, 1783, 1787, 1789, 1801, 1811, 1823, 1831, 1847, 1861, 1867, 1871, 1873, 1877, 1879, 1889, 1901, 1907, 1913, 1931, 1933, 1949, 1951, 1973, 1979, 1987, 1993, 1997, 1999]


Copyright ©2017, Software Developer, All rights reserved.
See Contents
Function "join()" in Python

Function join() in Python 

In this post, with a simple example, the power of the "join" function is presented.

l = ['This', 'is', 'a', 'sentence']
str = ' '.join(l)
print(str + '.')

Result:
   This is a sentence.

In the above  example, the "join" function is used to join a list of words by space.

Note: Actually, "join" is a method of the String class that returns a string in which the string elements of sequence are joined by the instance as separator. In the above example, the String instance is a space character: '  '. So the above example, could be written as:


l = ['This', 'is', 'a', 'sentence']
space = ' '
str = space.join(l)
print(str + '.')


Copyright ©2017, Software Developer, All rights reserved.
See Contents

A Quick Sort Code in Python

A Quick Sort Code in Python

In this post an efficient and short Quick Sort function is presented.

def QuickSort(arr):
    if len(arr) <= 1:
        return arr
    else:
        return QuickSort([x for x in arr[1:] if x < arr[0]]) + [arr[0]] + \
            QuickSort([x for x in arr[1:] if x >= arr[0]])


example = [15,4,2,6,17,4,11,19]

print(QuickSort(example))


Copyright ©2017, Software Developer, All rights reserved.
See Contents

Removing Consecutive Duplicates in Lists

Removing Consecutive Duplicates in Lists

In the following a simple and short function is presented that removes any consecutive duplicates in an arbitrary list.


def RemoveConsecutiveDuplicates(theList):
   return [item for index, item in enumerate(theList) \
      if index==0 or  item != theList[index-1]]


example = ['1','1','2','3','3','a','a','b','b','c','c','c','c','d']

print(RemoveConsecutiveDuplicates(example))

Result:

['1', '2', '3', 'a', 'b', 'c', 'd']

Copyright ©2017, Software Developer, All rights reserved.
See Contents

Generic Decorator to Convert Empty Arguments to None

Generic Decorator to Convert Empty Arguments to None

In the following, a generic decorator is developed to convert all the empty arguments of any arbitrary function to None.

def EmptyToNone(func):
    def innerFunc(*args, **kwargs):
        args = (None if item == "" else item for item in args)
        kwargs = {k:(None if v == "" else v) for k, v in kwargs.items()}
        return func(*args, **kwargs)
    return innerFunc

@EmptyToNone
def testingFunc(a, b, c, *d, **e):
    print(a, b, c, d, e)

testingFunc("", 1, "", 2, "", k="aaa")

Result: 

None 1 None (2, None) {'k': 'aaa'}


Copyright ©2017, Software Developer, All rights reserved.
See Contents

Saturday, March 18, 2017

DVM Anatomy

Dalvik Virtual Machine (DVM) Anatomy

By John Horton; Helder Vasconcelos; Raul Portales:
"After we write a program in Java for Android, we click on a button to change our code into another form that is understood by Android. This other form is called Dalvik EXecutable (DEX) code, and the transformation process is called compiling. The part of the Android system that executes (runs) our compiled DEX code is called the Dalvik Virtual Machine (DVM). The DVM itself is a piece of software written in another language that runs on a specially adapted version of the Linux operating system.


  locationManager.getLastKnownLocation(
    LocationManager.GPS_PROVIDER);

this single line of code searches for the available satellites and then communicates with them in orbit around the Earth while retrieving your precise latitude and longitude on the planet, it is easy to begin to glimpse the power and depth of the Android API in conjunction with the DVM. Even if that code does look a little challenging at the moment, imagine talking to a satellite in some other way!" [See Ref. 1]

[continued ...]

Copyright ©2017, Software Developer, All rights reserved.
See Contents

EditText Anatomy

EditText Anatomy

public class EditText extends TextView 

public class TextView extends View & implements ViewTreeObserver.OnPreDrawListener  

public class View extends Object & implements Drawable.Callback, KeyEvent.Callback, AccessibilityEventSource 

Classes Involved:

Object
Class Object is the root of the class hierarchy. Every class has Object as a superclass. All objects, including arrays, implement the methods of Object class.
View
Class View represents the basic building block for user interface controls (components). A View occupies a rectangular area on the screen and is responsible for drawing and event handling. View is the base class for widgets, which are used to create interactive UI controls; e.g., buttons, text fields, etc.
TextView
Class TextView displays text to users and optionally allows them to edit it. A TextView is a complete text editor, however, by default it is configured not to allow editing; that is why its sub-class EditText is created to configure the TextView for editing.

Interfaces Involved:

Drawable.Callback
KeyEvent.Callback
AccessibilityEventSource 
ViewTreeObserver.OnPreDrawListener


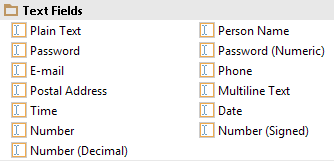
Visual Components (Controls) of EditText


Visual Components (Controls) of EditText

Visual Components (Controls) of EditText


EditText behaves differently based on the value of its inputType property. Example:

<EditText
 android:layout_width="wrap_content"
 android:layout_height="wrap_content"
 android:inputType="textEmailAddress"
 android:ems="10"
 android:id="@+id/editText"
 android:layout_centerVertical="true"
 android:layout_centerHorizontal="true" />


Note 1: Property inputType is provided for EditText from public interface InputType as in android.text.InputType.

Note 2: All EditText controls are subclasses of TextView:

All EditText controls are subclasses of TextView

How to Create EditText with Rounded Corners?

Step 1: Create an object (a resource) from class Drawable to specify how EditText must be drawn:

<?xml version="1.0" encoding="utf-8"?>
<!-- res/drawable/edittext_rounded.xml -->
<shape xmlns:android="http://schemas.android.com/apk/res/android"
android:shape="rectangle" android:padding="10dp">
 <solid android:color="#ffffff"/>
 <corners
 android:bottomRightRadius="20dp"
 android:bottomLeftRadius="20dp"
 android:topLeftRadius="20dp"
 android:topRightRadius="20dp"/>
</shape>

Step 2: Refer to the above resource in the layout:

<?xml version="1.0" encoding="utf-8"?>
<LinearLayout
xmlns:android="http://schemas.android.com/apk/res/android"
android:orientation="vertical"
android:layout_width="fill_parent"
android:layout_height="fill_parent" >
<EditText 
 android:layout_width="fill_parent"
 android:layout_height="wrap_content"
 android:padding="10dip"
 android:background="@drawable/edittext_rounded" />
</LinearLayout>


[continued …]


Copyright ©2017, Software Developer, All rights reserved.
See Contents